Localisation on live videos
Reasons for Replacing the Original Audio in a Live Video
There may be a need to replace the original audio in a live video with an alternative audio in certain situations. For example, if the original audio is low quality or difficult to understand, replacing it with a clearer and more intelligible audio stream can improve the overall viewing experience for the audience.
Another possible use case for replacing the original audio in a live video is to provide multiple language options. If the original audio is in a specific language, replacing it with audio in different languages can make the content more accessible and inclusive for audiences who speak different languages. This can be especially useful for live events that are broadcast to a global audience.
Additionally, replacing the original audio in a live video can be useful for accessibility purposes. For example, if the original audio contains background noise or music that makes it difficult for users who are deaf or hard of hearing to understand the content, replacing it with an audio stream that is specifically designed for accessibility can make the content more accessible and inclusive.
Implementing the Replacement of Original Audio in a Live Video
To replace the original audio in a live video, you can use a combination of video and audio processing tools and libraries, as well as streaming protocols and technologies. The exact implementation will depend on the specific requirements and goals of the project, as well as the platform and languages you are using.
Here is a general outline of how you can implement this functionality:
-
Capture the live video and audio streams from the source, using a video capture device or software, and encode the streams using a suitable video and audio codec.
-
Use a streaming protocol, such as RTMP (Real-Time Messaging Protocol) or HLS (HTTP Live Streaming), to transfer the live video and audio streams to a media server.
-
Use a media server, such as Wowza or Nimble Streamer, to receive the live streams and make them available for playback. The media server can also be used to transcode the streams, if necessary, to optimize them for different devices and networks.
-
Use a video player library, such as Video.js or Plyr, to create a player that can play the live video and audio streams from the media server. The player can provide APIs and event handlers that can be used to control the playback and switch between different audio streams.
-
Use audio processing tools and libraries, such as FFmpeg or SoX, to encode and prepare the alternative audio streams that will be used to replace the original audio. The audio streams should be encoded using a suitable audio codec and should be synchronized with the video stream.
-
Use the APIs and event handlers provided by the video player to switch between the original and alternative audio streams as needed. This can be triggered by user input or other events, and can be done without interrupting the video playback.
Overall, implementing this functionality will require a combination of technical skills
In the solution outlined here, the audio and video is combined in real time on the server. A word of caution here, if the audio and video sources are separated geographically, there could be sync issue due to different network latencies.
Lets see how to do this setup.
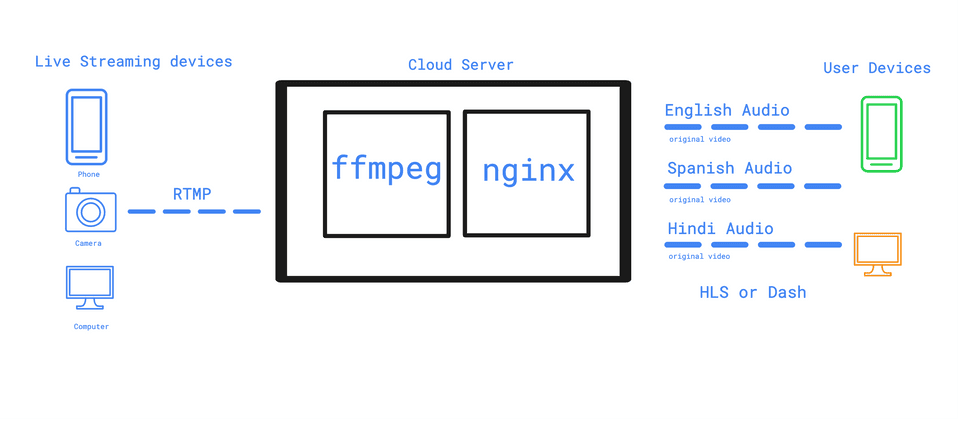
In this solution, we use ffmpeg and nginx in the cloud to combine the audio streams and serve them using the hls (or dash) protocol.
Here are the steps needed:
- Create a customised nginx build with the nginx-rtmp-module
- Configure nginx on the server
Lets talk about these steps in a little more detail:
We are using nginx for this solution, because nginx is
- Time tested solution for great performance when it comes to serving files.
- If other than live, we also need to stream static video files (VOD), nginx has built in VOD capability. That is, without nginx, the browser would download the entire video file. (which is unnecessary as only the video, being viewed needs to be downloaded in an incremental manner as we play)
- Even if we build our own solution, we would anyways need nginx to sit on top of it.
Nginx does not ship with the capability to serve hls or dash from rtmp. We would need to create a new nginx build with this feature. We would have to compile nginx with the nginx-rtmp-module. And then install this version of nginx on our server.
Once done, the next step would be to configure nginx so that it receives the live stream along with one (multiple) live audio streams and serves the video with the audio stream.
Configuring nginx for RTMP
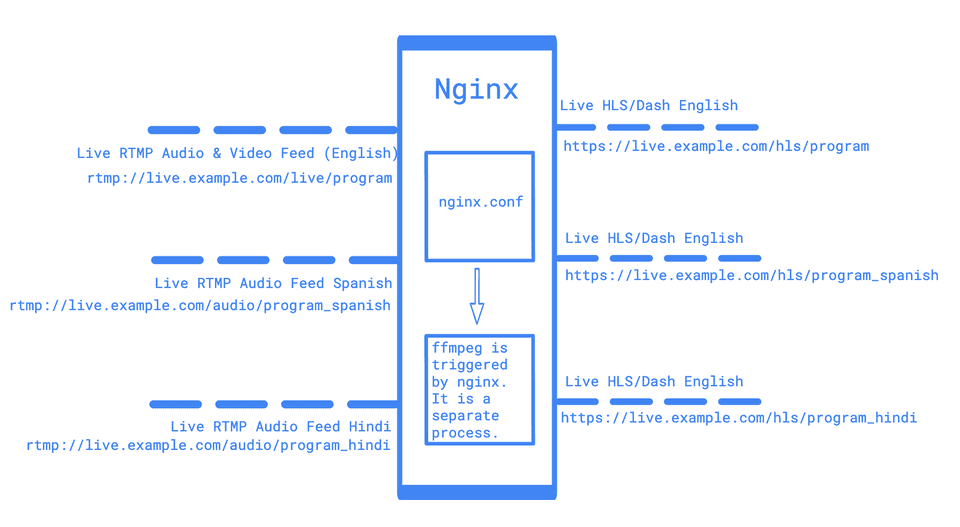
Nginx can now be configured to serve the live video with different audio streams. For examples, say multiple languages. Lets look at what we are planning to achieve.
As shown in the figure above, we will send the original live stream to rtmp://live.example.com/live/program. Here, live.example.com is our server running nginx. The live after that is the nginx-rtmp application we will configure. The program is any string.
Below is the configuration for nginx to receive the live rtmp stream.
rtmp {
        application live {
            live on;
            record off;
     }
}
Similarly, we will configure nginx to receive the audio streams as below.
rtmp {
        application audio {
            live on;
            record off;
     }
}
Next, we need to configure nginx to convert rtmp to hls, which is done as below.
application hls {
    live on;
    hls on;
    hls_path /mnt/hls;
    hls_nested on;
}
With this, we have three rtmp applications, i.e. ‘live’, ‘audio’, and ‘hls’. We will use ffmpeg to take the live and audio streams and send it to the ‘hls’ application, which will convert it to hls segments, available over http(s)
Now that, we have configured nginx for the rtmp streams, lets look at ffmpeg. The ffmpeg command to take two streams and output a third stream is as below. In the below command, we extract the video from the first and the audio from the second and create a third stream with both.
ffmpeg -i rtmp://live.example.com/live/program -i rtmp://live.example.com/audio/program_spanish -c copy -map 0:v -map 1:a -ab 128k -ar 44100 -f flv rtmp://live.example.com/hls/program_spanishThe above command creates a new rtmp stream and sends it to the ‘hls’ application of our nginx server - rtmp://live.example.com/hls/program_spanish
The hls application would now, start creating the hls segments at /mnt/hls, which can be served using http. Before that, lets look at how to trigger the ffmpeg command from nginx. To do that, we will use the exec directive of the nginx-rtmp-module. We will trigger the command, once we receive the audio stream. To make the command resuable, we will create a shell script and trigger the shell script using the exec directive. Like below:
   application audio {
               live on;
               exec bash /usr/local/nginx/live_stream/live_script.sh $app $name;
               record off;
   }
The above triggers a shell script at location /usr/local/nginx/live_stream/live_script.sh it further passes two arguments to the script. $app is the name of the application, in this case ‘audio’ and $name is the name of the stream, in our case (from picture) it is ‘program_spanish’.
Let’s take a look at how our shell script could look like:
#!/bin/bash
on_die (){
 # kill all children
 pkill -KILL -P $$
}

#video stream rtmp://host/live/name
#audio streams rtmp://host/audio/name_lang1, rtmp://host/audio/name_lang2, rtmp://host/audio/name_lang3
#creates multiple video urls like https://host/hls/name_lang1, https://host/hls/name_lang2, https://host/hls/name_lang3

#First check if the stream has a name and lang, audio streams have to have an underscore (_) separating name/lang

if [[ $2 == *"_"* ]]; then
 # This is a valid audio stream
 echo "audiostream is rtmp://host/audio/$2"
 # Next check if the video RTMP stream is available.
 videoStream=`echo $2 | cut -d'_' -f1`
 echo "video stream is rtmp://host/live/${videoStream}"
 ffprobe -v quiet -analyzeduration 500k -probesize 100k  -i rtmp://host/live/${videoStream}

if [[ $? == 0 ]]; then
 echo "video stream available"
 echo "Check http://host/hls/$2.m3u8"
 ffmpeg -i rtmp://host/live/${videoStream} -i rtmp://host/audio/$2 -c copy -map 0:v -map 1:a -ab 128k -ar 44100 -f flv rtmp://host/hls/$2
else
 echo "NO video stream available"
fi

else
 echo "Invalid audio stream "
fi
trap 'on_die' TERM
With this done, we now have nginx creating the the hls segments. The only thing left is to configure nginx to serve them via http. The nginx ‘http’ directive like below will do this for us.
server {
    listen       8081;
    directio 512;
    default_type application/octet-stream;

        location /hls {
            types {
                application/dash+xml mpd;
                application/vnd.apple.mpegurl m3u8;
                video/mp2t ts;
             }
            root   /mnt/;
        }
  } # end of server
Thats it.
If any questions, feel free to contact me.

